Showing posts with label baking. Show all posts

27 October 2010

A Return to the Daring Bakers- Doughnuts


I have an unhealthy obsession with doughnuts. I love them, well and truly. Although I avoid most fried foods as I don't think they're worth the calories, doughnuts will get me every time. Don't get me wrong, it's not like I'll eat any doughnut that crosses my path. As a rule, I prefer cake style over yeast, especially if those yeast doughnuts come from Krispy Kreme. A certain college roommate of mine loved Krispy Kremes, particularly the way they 'melted in your mouth'. Her words, not mine; I like to masticate my baked goods, thank you.

The only other time I attempted doughnuts was in my 10th grade foods class in high school. I remember the special cookie cutter we had (with center hole removal device) and covertly snacking from a brown bag of doughnuts for the rest of the day. Needless to say, I was pleased with the first challenge to bring me back in to the DB fold.

The October 2010 Daring Bakers challenge was hosted by Lori of Butter Me Up. Lori chose to challenge DBers to make doughnuts. She used several sources for her recipes including Alton Brown, Nancy Silverton, Kate Neumann and Epicurious.

I chose the
Pumpkin Doughnut recipe from Bon Appetit Magazine, by way of Epicurious, as it was a cake-style doughnut, and I had half a can of pumpkin in the fridge from another recipe. I didn't get creative with this one, besides cutting the recipe in half (as there was absolutely no reason for me to have 24 freshly fried tempting treats in my kitchen), so you can follow the link to get to the recipe. This time around, I didn't have a special device for cutting out the center hole so I improvised and used a rolled up piece of paper. Not the best, but it worked, especially once I started dipping it in flour between cuts. The only word of advice I have on the recipe-- make just half the amount of spice sugar to roll the doughnuts in. I made the amount the recipe called for and had tons left over.

12 October 2010

A Tuesday with Dorie


I just spent a Tuesday with Dorie, and not just in cookbook form, in real, live, reading from Around My French Table, telling stories about Madame Saucisson form. This was my first book signing, and I was utterly charmed. Dorie is, as they always say, much smaller than the slim woman you expect from pictures. So small, you wonder how she could really be the author of so many books about food, but then she starts talking and you immediately think that yes, this is someone who knows food and loves to share it, both in cookbooks, and in person for those lucky enough to be guests in her home.

As I was waiting in line to have my book signed, I started chatting with some fellow Dorie-admirers, who happen to be food bloggers as well. Strange as this may sound, it was the first time I had ever met other food bloggers in person. Three out of the four of us had been
Daring Bakers at one point, and I was reminded again how easy it can be to talk to complete strangers when food is the common denominator. Meeting them, and talking with one of my food idols has inspired me to give Real Good Taste another go, so you will be hearing from me again in the near future. Until then, I'll leave you with a few links to my favorite Dorie Greenspan recipes.

Perfect Party Cake (the name really does say it all)
Dorie's
Macarons Parisiens (I'm still working on perfecting this one)
Florida Pie (you'll never go back to plain Key Lime again)
Chocolate Chocolate Cupcakes (you can see the recipe if you search in
Baking: From My Home to Yours on Google books
And finally, Dorie's own
website, where she often posts recipes and stories about her fabulous life.

06 December 2009

Wedding Cake Continued


Heading back to the subject of wedding cakes, I thought I would tell you a bit about my experience baking one. J- asked me a few months ago if I would be able to make the cake for her wedding. Of course I agreed, I mean, if she was willing to trust me to bake for her wedding, who was I to say no. I promptly put the subject out of my head for a few weeks only to begin researching- the more I learned, the more a feeling of dread started to creep into my stomach.

I quickly realized, after spending some quality time on the
Wilton website, that there was no way I could bake a single cake that would serve 160 people, the anticipated number of guests. I put the idea to J- of a smaller two tier cake (her original request) along with a sheet cake or two. She agreed and I got to work. We talked flavors and she and P-, her then fiance now husband, decided on two- a lemon raspberry I based on Dorie's Perfect Party Cake and I carrot cake using Ina Garten's recipe.

I used the Wilton
charts to figure out how much batter I needed for each cake pan and made Excel charts with formulas to determine how much I needed of each ingredient. I shopped, and then I began baking and kept baking and baking for two days. One of those days I ate nothing but frosting. For some reason I thought it was a good idea, and cream cheese frosting has some calcium in it, right? I also called Zach in a panic about 5 times when I though that the carrot cake had failed. His co-workers probably thought I was nuts, although I had buttered them up with many samples of the prototypes.

In the end, the cake and I both survived. J- had little photos made of her and P- and we used them to decorate the cake, I thought the black and white looked great against the cream cheese frosting. Now that's it's a few weeks after the wedding and I can actually think of frosting again without my stomach turning over, I'm looking forward to my next baking challenge.

05 December 2009

Spinach Pie with Yeast Crust


One of my first uses of the yeasted pastry crust was this spinach pie. I like to think of it as a cross between a spinach pie, where the majority ingredient is spinach and is only bound together with a bit of egg, and a quiche, that deliciously silky dish of eggs and cream, sometimes flavored with a bit of spinach. This pie is light, almost fluffy, green with spinach and kept from boring with a bit of herbs de provence, nutmeg and cheddar cheese. If you have a crust ready to defrost from the freezer it comes together in just a few minutes. I've served it with salad, although that is a bit unnecessary with all the spinach. A light soup might be nice or, you could do what I did, and wrap up a leftover slice and take it to the airport with you- the crust will hold it together - then, when everyone else is buying $9 sandwiches that taste like cardboard, you can unwrap it and enjoy. Recipe after the jump.

Spinach Pie
Serves 6, 8 as an appetizer
Adapted from the Weight Watchers Cookbook

1/2 recipe
yeasted pastry crust OR 1 recipe better for you pie crust OR a 9-10 in pie crust of your choice
16 oz (450g) frozen chopped spinach, thawed and water squeezed out
1/3 C low-fat cottage cheese
2 eggs
3 egg whites
1, 12oz (300ml) can fat-free evaporated milk
1/2 t salt
a few grinds fresh pepper
a grate or two of fresh nutmeg
1 t herbs de provance
2 oz. (56g) cheddar cheese, shredded


- Preheat oven to 375. Grease a pie plate or ovenproof skillet. Roll out the dough and inch or two bigger than the baking vessel (just pop the pan on top of your rolled out dough to see if you need to roll it bigger). Gently roll the dough about half with up the rolling pin, starting at the far end and picking up the dough with your finger and letting it roll under the pin as you roll it back. Lift the pin with the dough straight up, drape the loose bit over one end of the pan and roll it across. Press the crust down into the pan and trim the edges so they don't hang overboard. Use the trimmings to patch up any holes that may have occurred.

- Sprinkle the spinach evenly over the crust.

- Place remaining ingredients through the herbs in a blender or blending beaker and wizz the heck out of them, until the mixture is perfectly smooth. [if you don't have a blender just wisk it well by hand, the cottage cheese will remain a bit lumpy but it'll taste fine]. Pour the egg mixture over the spinach in the crust and then sprinkle the cheese on top.

- Carefully place the pie in the oven and bake for 20-25 minutes or until puffed and very nearly set in the center (test by jiggling the pan slightly- be sure to use and oven mitt). Allow to cool for 10 minutes before serving.

04 December 2009

Wedding Cake


Jeez- it's only the fourth day of NaBloPoMo and already I'm writing this up after 11pm... so much for avoiding the procrastination bit. A few weeks ago I made a wedding cake (well several wedding cakes) for a friend. The experience was both useful and utterly exhausting, which is why I haven't posted about it before now.

Lesson 1: It is entirely possible to make cake for 160 in a home kitchen.

Lesson 2: Eating nothing but frosting all day inadvisable.

More, and more useful, lessons from my wedding cake experience to come. And here is the rest of it.

03 December 2009

Yeasted Pastry Crust


The friend who introduced me to Dessert Grec also introduced me to the New York Times Health Section recipes. Like so many in the DC area, I get the Washington Post, and don't read the Times. Even if I did, I wouldn't look to the Health Section for something to eat, but that is where Martha Rose Schulman posts a new recipe every week, one purporting to have certain healthful components. I found the setup a bit cumbersome, a recipe index would be handier than an un-alphabetized list of themes/ingredients, but C- likes it and while I was visiting last month, we made a few of the recipes. Some were better than others (cauliflower topped with nearly straight up tahini was a miss) but I was intrigued by a whole pastry dough made with yeast and resolved to give it another go when I got home.

When I got home a few weeks ago, I made a batch of the dough in about 5 minutes, using my KitchenAid. So far so good. The dough rose exactly as expected and I rolled a little less than half of it out to use as a crust for a spinach pie. As Schulman notes, it is easier to work with than a traditional pie crust- the gluten you develop with a light kneading makes the dough stronger and less prone to holes and breaking. Another plus- it's made with half whole wheat flour and perhaps the biggest plus of all, just a quarter of a cup of olive oil, making it much lower in fat, saturated fat, and calories than a traditional crust. It does have a pronounced whole wheat flavor, which I liked in the spinach pie, but which has the potential to overpower more delicate ingredients. I found it a tad salty as well; next time I'll reduce the salt a bit and see if that helps.

Even with the slight problems, this is my new go-to crust for savory applications, especially in pie form. For sweet things and if when I want a flakier crust, say for free form apple pie, I'll still use my
Better for You Pie Crust . One last note- with the dough scraps from tonight's dinner, I made simple plain and cinnamon sugar crackers, the best homemade crackers I've ever made. It's worth making a batch or half batch of the dough, rolling it thin, and then baking it up for a crispy snack.

For Martha Rose Schulman's Whole Wheat Yeasted Olive Oil Pastry click
here.

27 May 2009

Apple Strudel


This was a last minute challenge if I've ever done one. Zach and I got back from a weekend in New York on Monday night and when I logged in to the Daring Kitchen yesterday, just to check on the ingredients needed for this months challenge, I was startled to see that I had just one night for the challenge. Luckily, this month's apple strudel seemed manageable so I made a grocery list and got to work.

The strudel dough came together so quickly I almost wanted to laugh- really, this easy? I prepped the apples while the dough rested and then met a friend at the gym. When we got back, I spread an old sheet over half of the dining room table and while K* and Zach looked on, proceeded to roll and stretch out the dough. Once I floured both side of the dough, it rolled out easily. I tried to be as delicate as possible when picking it up to stretch out, but I still got a few holes, which I patched up with a little water. The dough didn't quite make it to 2'x3' but it was tissue thin in most parts so I cut off the edges, put in the filling and rolled the whole thing up, using the sheet as a sling.

After 30 minutes in the oven, the strudel came out golden brown and with a buttery, tangy apple smell filling the house. I attempted to wait patiently for the required 30 minutes, then K* and I tried a piece. I was shocked at how well the dough came out- crisp, lightly buttery in contrast to the soft apples and raisins. This one is a definite keeper.

The May Daring Bakers’ challenge was hosted by Linda of make life sweeter! and Courtney of Coco Cooks. They chose Apple Strudel from the recipe book Kaffeehaus: Exquisite Desserts from the Classic Cafés of Vienna, Budapest and Prague by Rick Rodgers.

Apple Strudel

(Tips and notes from our hosts at the bottom)

Preparation time
Total: 2 hours 15 minutes – 3 hours 30 minutes

15-20 min to make dough
30-90 min to let dough rest/to prepare the filling
20-30 min to roll out and stretch dough
10 min to fill and roll dough
30 min to bake
30 min to cool

Apple strudel
from “Kaffeehaus – Exquisite Desserts from the Classic Cafés of Vienna, Budapest and Prague” by Rick Rodgers

2 tablespoons (30 ml) golden rum
3 tablespoons (45 ml) raisins
1/4 teaspoon ground cinnamon
1/3 cup plus 1 tablespoon (80 g) sugar
1/2 cup (1 stick / 115 g) unsalted butter, melted, divided
1 1/2 cups (350 ml) fresh bread crumbs
strudel dough (recipe below)
1/2 cup (120 ml, about 60 g) coarsely chopped walnuts
2 pounds (900 g) tart cooking apples, peeled, cored and cut into ¼ inch-thick slices (use apples that hold their shape during baking)

1. Mix the rum and raisins in a bowl. Mix the cinnamon and sugar in another bowl.

2. Heat 3 tablespoons of the butter in a large skillet over medium-high. Add the breadcrumbs and cook whilst stirring until golden and toasted. This will take about 3 minutes. Let it cool completely.

3. Put the rack in the upper third of the oven and preheat the oven to 400°F (200°C). Line a large baking sheet with baking paper (parchment paper). Make the strudel dough as described below. Spread about 3 tablespoons of the remaining melted butter over the dough using your hands (a bristle brush could tear the dough, you could use a special feather pastry brush instead of your hands). Sprinkle the buttered dough with the bread crumbs. Spread the walnuts about 3 inches (8 cm) from the short edge of the dough in a 6-inch-(15cm)-wide strip. Mix the apples with the raisins (including the rum), and the cinnamon sugar. Spread the mixture over the walnuts.

4. Fold the short end of the dough onto the filling. Lift the tablecloth at the short end of the dough so that the strudel rolls onto itself. Transfer the strudel to the prepared baking sheet by lifting it. Curve it into a horseshoe to fit. Tuck the ends under the strudel. Brush the top with the remaining melted butter.

5. Bake the strudel for about 30 minutes or until it is deep golden brown. Cool for at least 30 minutes before slicing. Use a serrated knife and serve either warm or at room temperature. It is best on the day it is baked.
Strudel dough
from “Kaffeehaus – Exquisite Desserts from the Classic Cafés of Vienna, Budapest and Prague” by Rick Rodgers

1 1/3 cups (200 g) unbleached flour
1/8 teaspoon salt
7 tablespoons (105 ml) water, plus more if needed
2 tablespoons (30 ml) vegetable oil, plus additional for coating the dough
1/2 teaspoon cider vinegar

1. Combine the flour and salt in a stand-mixer fitted with the paddle attachment. Mix the water, oil and vinegar in a measuring cup. Add the water/oil mixture to the flour with the mixer on low speed. You will get a soft dough. Make sure it is not too dry, add a little more water if necessary.
Take the dough out of the mixer. Change to the dough hook. Put the dough ball back in the mixer. Let the dough knead on medium until you get a soft dough ball with a somewhat rough surface.

2. Take the dough out of the mixer and continue kneading by hand on an unfloured work surface. Knead for about 2 minutes. Pick up the dough and throw it down hard onto your working surface occasionally.
Shape the dough into a ball and transfer it to a plate. Oil the top of the dough ball lightly. Cover the ball tightly with plastic wrap. Allow to stand for 30-90 minutes (longer is better).

3. It would be best if you have a work area that you can walk around on all sides like a 36 inch (90 cm) round table or a work surface of 23 x 38 inches (60 x 100 cm). Cover your working area with table cloth, dust it with flour and rub it into the fabric. Put your dough ball in the middle and roll it out as much as you can.
Pick the dough up by holding it by an edge. This way the weight of the dough and gravity can help stretching it as it hangs. Using the back of your hands to gently stretch and pull the dough. You can use your forearms to support it.

4. The dough will become too large to hold. Put it on your work surface. Leave the thicker edge of the dough to hang over the edge of the table. Place your hands underneath the dough and stretch and pull the dough thinner using the backs of your hands. Stretch and pull the dough until it's about 2 feet (60 cm) wide and 3 feet (90 cm) long, it will be tissue-thin by this time. Cut away the thick dough around the edges with scissors. The dough is now ready to be filled.

Tips
- Ingredients are cheap so we would recommend making a double batch of the dough, that way you can practice the pulling and stretching of the dough with the first batch and if it doesn't come out like it should you can use the second batch to give it another try;
- The tablecloth can be cotton or polyster;
- Before pulling and stretching the dough, remove your jewelry from hands and wrists, and wear short-sleeves;
- To make it easier to pull the dough, you can use your hip to secure the dough against the edge of the table;
- Few small holes in the dough is not a problem as the dough will be rolled, making (most of) the holes invisible.

26 January 2009

Healthy Desserts Week: Choco Cupcakes


Ok- maybe I shouldn't be ending healthy desserts week with a recipe for chocolate cupcakes but hear me out. One small cupcake is not the end of the world, or even the diet if you happen to be on one. Yes, a commercially made, baseball sized, trans-fat packed cake with a mountain of whipped Crisco, oops, I mean frosting, is not remotely healthy or tasty. But, one small homemade cupcake at the end of a week of eating healthily, well, it just makes sense. Why deprive yourself of all chocolate or baked goods, when all that's really needed is a bit of moderation.

One of my biggest problems with baking (other than straight up disasters) is the leftovers. Since Zach and I are just two, there is always way too much just sitting around the house, even when I cut recipes in half, as I often do with Daring Bakers challenges. I either have to plan to have people over or I end up eating way too many sweets. Well, this time I decided to cut back, way back, on a recipe to only make 3 cupcakes (why 3? well the recipe originally made 12 cupcakes so 1/4 of it makes 3, though it would have made a bit more sense to do a third of the recipe and get 4 cupcakes out of it...). This would solve the problem of leftovers and, as I said earlier, one cupcake is not a bad thing.

I chose a recipe from 500 Chocolate Delights, a cookbook my friend D-- gave me a few years ago, for Mississippi Mud Cakes. The book is definitley British in origin, so I was a bit curious as to the name of the cupcakes but they looked very chocolaty so I thought I'd give them a try. The batter comes together in just a few minutes and uses ingredients most people have in the cupboard.

The cupcakes weren't quite as chocolatey as I had hoped, but I think the addition of some cocoa powder (I've added it as an option in the recipe below) should fix that. The small portion size and total number of cakes worked out really well so I think I will be sizing down more baking recipes in the future.

Small Batch Choco Cupcakes
Makes 3

1/4 C (40g) chocolate chips
3 T (40g) butter
1 T cocoa powder
1 egg
2 t (10g) sugar
3 T. (22g) self raising flour (or 2.5t flour + 1/4t. baking powder)

- Preheat oven to 325. Grease your cupcake tins or use silicon molds.

- Melt the chocolate chips and butter in a small microwave safe bowl. Add the cocoa powder and stir to combine. Lightly beat the egg in another small bowl. While stirring, slowly pour the chocolate mixture into the egg [this could potentially scramble your egg so if the chocolate mixture is too hot to touch, wait a few minutes until is cooled down]. Add sugar and flour and mix well. Divide mixture between the three cupcake tins/molds and bake for 17-20 minutes or the tops are mostly dry and set. Serve immediately or let cool for later.

Healthy Desserts Week: Italian Pear Cake

After a brief break, healthy desserts week is back for two last posts.

I decided to get the new year off to the right start (it seems a bit old already, doesn't it?) by making this pear cake for dessert on New Year's Eve. I was flipping through The Essentials of Italian Cooking when I came across this recipe, in the book called "A Farmwife's Pear Tart" and was intrigued (or as intrigued as I could be as I read out the name to Zach and he started laughing). More pear than batter and the batter itself had no fat or leavening agents. It sounded a bit strange, but as Marcella Hazan has never led me wrong in the past, I thought I'd give it a try.

I chose fairly firm Anjou pears, according to Marcella's instructions, peeled them, cut them in half and used a teaspoon to scoop out the core. Then I sliced each half into about four thick slices lengthwise. I mixed all the other ingredients into a rather thick batter (with the addition of some vanilla extract though I would have preferred to use almond had I had any- pear and almond make such a nice combination) and sent in the pears, giving everything a few good turns with the spatula. I poured, well pour isn't really the right word, since at this point the cake was more like pear slices thinly covered in batter; in any case, I got the batter into the pan and attempted to even it out as best I could, then dotted on about 2 teaspoons of butter (which the recipe said was option but I didn't want my guests to be in diet dessert purgatory) and baked till puffy and lightly golden.

The cake is moist and dense, yet as it's still mostly pear, wasn't too heavy. The fruit hadn't become too soft and still had a pleasant texture which the soft cake contrasted well with. Everyone like it, so this will definitley be on the menu again. Yes, it does have a fairly high amount of sugar, but I think that is to keep the cake moist in the absence of fat. Next time I will probably try cutting down on the sugar and seeing if it still works out.

Italian Pear Cake
Adapted from The Essentials of Italian Cooking
Serves 8


Note: Because of the high moisture content this cake needs to be stored in the fridge if you are not eating it right away.

2 eggs
1/4 C (20ml) milk
1 C (200g) sugar
1 t. (5ml) almond or vanilla extract
pinch of salt
1.5 C (180g) all-purpose flour
2 lb. (900g) firm, but not rock hard, winter pears
2 t butter (optional)

- Preheat oven to 375F. Butter and flour a 9in round pie plate or cake pan.

- Beat together eggs, milk, sugar, extract and salt. Wisk in flour. Set aside.

- Peel pears. Cut in half and scoop out the core. Cut into thick 1/2 (1cm) slices lengthwise. Stir sliced pears into batter.

- Pour pear mixture into the pan and spread out as evenly as you can. Dot with the butter (if using-- it will help the top brown) and bake for about 50 minutes or until puffy and lightly golden. Remove from oven and cool for 10 minutes in the pan, then remove to a cooling rack. Serve warm or at room temperature.

06 January 2009

Sour Cream Espresso Cake

Some technical difficulties have kept me off the internet and my first (nearly) two week vacation in years meant I was out of the kitchen but now that I am (sadly) back at work and the normal routine I will be back to posting and visiting your blogs.

There were a few things I made before the break that the internet problems have prevented me from posting that I'll put up now with a slight warning-- this was finally finished with the semester and its the holidays so I can eat whatever I want kind of food. This really hasn't worked out that well for me so you can expect healthier recipes to come.


But back to the task at hand. As soon as I saw Sue's post about Sunny Anderson's mini espresso cakes I knew I had to make them. Immediately. Luckily the semester was winding down so I thought some baking would help me relax and be more focused on my papers (at least that's what I told myself) . I followed the recipe pretty closely with just a few modifications. Instead of using 2 eggs and 2 yolks, I just used 3 eggs as Sue had successfully done. Also, I ended up using freeze dried coffee crystal instead of espresso powder. I had never bought either before and as Trader Joe's had only one kind of instant coffee, that's what I went for.

As I had no idea what the equivalent espresso powder to coffee crystal ratio was, I decided on a third of a cup. The recipe calls for you to mix the coffee with the sour cream to hydrate it and I gave this a taste to try to gauge whether it needed more coffee. It was so bitter I was a bit afraid I had ruined the whole thing! I pressed on though as I didn't want to be wasteful, and the final batter was so good, like coffee ice cream, but thicker and richer that I knew the cake would turn out. Since I didn't have mini loaf pans, I baked three small cakes in three random pans/molds. I brought one to work, gave one away and kept one for home.

Judging by how quickly the cakes disappeared, they went over really well. The cake is incredibly moist and has a strong but not overwhelming coffee flavor. I really should have told people that each cake had the equivalent of 7 cups of coffee though...

One last note-- the sour cream makes this cake so moist it keep fresh for 4-5 days on the counter and would a great one to mail to friends.

Sour Cream Espresso Cake
Makes 3-4 mini cakes
Adapted from Sunny Anderson


2.5 C (300g) flour
3/4 t. baking powder
1/2 t. baking soda
1/4 t. salt
1 C (250 ml) sour cream
1/3 C instant coffee crystals (should have the metric equivalent soon)
1 C (225g) butter, softened
1.5 C (300g) sugar
3 eggs
1 t. vanilla extract

- Preheat oven to 350F and grease and flour your pans.

- In a small bowl mix sour cream and coffee crystals. Set aside.

- In another bowl, combine flour, baking power, baking soda and salt.

- In your mixer bowl,* cream together butter and sugar, beating until light and fluffy. Then add eggs, one at a time and beat until incorporated. Add the vanilla. With the mixer on low, add half the flour mixture. Let in incorporate before adding half the sour cream, then the rest of the flour and sour cream.

- Pour the batter into the pans and bake for approx. 40 minutes or until the cake has pulled slightly away from the side of the pans and a toothpick inserted in the middle comes out clean. Cool and eat.

* You certainly don't need a stand mixer to make this recipe but I wasn't quite sure what else to call the bowl.

30 December 2008

Bouche de noel


This month's challenge is brought to us by the adventurous Hilda from Saffron and Blueberry and Marion from Il en Faut Peu Pour Etre Heureux. They have chosen a French Yule Log by Flore from Florilege Gourmand.

This recipe had so many components and steps I'm not quite sure where to start. I made it a few weeks ago the night before my last paper was due. I started the bouche de noel and the editing at around 7pm and wrapped up at 12:30am...but had about another 45 minutes of prep on the cake in the morning before I headed to school to turn in the paper.


Wow... this post sounds really boring. I think it's because I don't really have much good to say about this month's challenge. I normally don't mind when a Daring Bakers' challenge takes forever as I feel like I am learning along the way. This time though, I think something got lost in the translation/conversion of the recipe from French and Metric into English and Customary. I was confused about pretty much everything, how long to cook each component, what consistency it should be and don't even get me started on using gelatin (suffice to say - never again). Luckily the bouche came out pretty well in the end (despite a disastrous creme brulee layer that wouldn't set at all) . Everyone enjoyed it but I think it's safe to say... I'll never make it again.

I hate to be so negative, espcially when I know how much work everyone put into this so thinking my hardest, I've come up with a few things I've learned from this recipe:

1) Gelatin is disgusting and I feel completely vindicated in my refusal to eat or use it for the past 12 years. Next time I'll use a vegetarian alternative.

2) If caffeine after 5pm keeps you up at night, eating a mocha bouche de noel at 10:30pm is not a good idea.

3) I am really spoiled as so many blogs, recipes and cookbooks are in my native language and units of measure. I have a newfound respect for those of you who translate languages and measures to work on Daring Baker's challenges or other recipes.

25 November 2008

Another Perfect Party Cake


I ended up baking a birthday cake on short notice this weekend and returned to what is now and old favorite, Dorie Greenspan's perfect party cake, the one that I made as my first Daring Bakers Challenge. This time I made the full four layers and it came out so well that I thought I'd share the picture with you. 

If you're looking for a cake to make for a group- this one is it. Lemon, berries and coconut look beautiful and are a great alternative to the typical vanilla and chocolate combos plus the cake is pretty easy to make and the full cake serves about 20.

One quick tip-- less is really more when it comes to the jam filling.  I sort of overdid it on this one.

12 November 2008

Apple Cinnamon Muffins and an Occasion


What's the occasion? Well my 102nd post on the blog and the first time (besides moving in) that we've had more than 4 people over to the new house. I'm really proud to have gotten up to 102 posts and I have to thank each and every one of you for taking the time to read my blog. Everyone who has emailed or posted a comment- thank you, I really do love hearing from you. I started this blog as a way to force myself to write down recipes instead of just making something once and really wishing I could recreate it. In the past 8 months I have made some old favorites and found some new one thanks to all the great food bloggers out there. There is so much out there to cook I really have no excuse to ever say 'I don't know what to make for dinner'. I'd also to thank my fellow Daring Bakers for coming up with challenges that always push my baking abilities to the limit. So- thank you everyone.

Besides the blog milestone the other occasion was a sort of drop by to see the house brunch we had on Saturday. With everyone schedule's starting to get crazy at the end of the year Zach and I decided to have an early open house that friends could drop in for. I wasn't exactly sure how many people would come by or when, so I wanted to make some light brunch food that could sit at room temperature for a few hours. Since I am not a morning person (understatement of the year) I also wanted to make and prep as much as I could on Friday night, so I would have as little to do on Saturday morning as possible. Muffins were a natural choice as I could make the batter the night before and bake them in the morning. I made a few other things, which I'll be posting about later in the week.

These muffins are based on the basic recipe in Alton Brown's I'm Just Here for More Food. I substituted milk and vinegar for the yogurt the recipe called for and added the apples and spices. This recipe will make 24-30 muffins, depending on how big you like them but you could easily split it in half or double it. It's perfectly fine to mix up the batter at night and store in the fridge (well covered) till morning. When it's time to bake the batter up, scoop it directly from the bowl to your greased muffin tins and do not stir the batter!. Stirring will cause it to deflate and leave you with leaden muffins.

Apple Cinnamon Muffins
Makes 24
Adapted from a recipe by Alton Brown


Wet Ingredients:
1.5 C. lowfat milk
1 T. apple cider vinegar
1 C. vegetable oil
2 eggs
2 egg yolks
1 C. (205g) sugar (yes the sugar is a wet ingredient here)

Dry Ingredients:
4.5 C. (606g) all purpose flour
4 t. (20g) baking powder
2 t. (6g) baking soda
fat pinch of salt
1 t. cinnamon
3/4 t. ground ginger
10 grates nutmeg

1 lb (450g) apples, chopped into small pieces (I did mine in 1/4 in. cubes)


- Baking prep (the day you will bake the muffins). Preheat oven to 375F. Grease a muffin tin or two.

- Put the first 7 dry ingredient in a bowl and mix with a wisk till well combined. Add the apples and stir to coat them with flour.

- In another bowl mix the wet ingredients till well combined. Add wet ingredients to dry ingredients and stir with a wisk until just combined. The batter will be slightly lump and may have a few dry spots but this is ok.

- Fill you muffin tins, filling each up about 3/4 or all of the way. Bake for 18-20 minutes until the top is lightly browned and a toothpick comes out clean.

- Carefully remove the tins from the oven and flip each muffin onto its side in the tin by inserting a butter knife on the side of the muffin and using it to gently turn the muffin. This will allow steam to escape and prevent soggy muffins. Serve immediately.

29 October 2008

Daring Bakers- I Love You or How I Made the Best Pizza Ever

Well the title pretty much said it all. I had given up hope of ever making a decent pizza at home but thanks to Rosa from Rosa's Yummy Yums, host of this month's challenge that's all changed. This was the easiest dough to put together-- the recipe even calls for cold water so there's no chance of accidentally killing the yeast. The overnight rise in the fridge allowed the flavor of the dough to develop but I think the secret was patting the dough (in pizza size balls) out into disks before the second, room-temperature rise. That made it so much easier to toss the dough into a the pizza form. I say toss the dough like I'm a piazzola or something but the truth is that my first attempt at tossing the disk on my knuckles to stretch it out went a bit too well too quickly resulting is a torn mess that was paper thin in some parts and an inch thick in others.

I was a bit disheartened but just mashed it back into a ball and started on the second dough. This time I treated the dough very carefully as I realized how light and delicate it was. I floured my hand and very gingerly picked up the dough disk and set it on top of my folded knuckles and started using a gentle outward and upward motion of my hands to stretch and rotate the dough. Once it was thin enough (which for me is pretty much paper thin) I set it down on a floured cookie sheet and topped it with olive oil, fresh chopped tomato, torn fresh basil and mozzarella cheese, all in very small quantities.

The pizza stone was fired up in the oven and I attempted to transfer the pizza from the sheet to the stone. That attempt was quickly thwarted as the pan was too big for the oven (ah the joys of my old kitchen). I didn't know what to do but felt I had to make a quick decision before I let all the heat out of the oven so I stepped back and sort of threw the pizza off pan and onto the stone. It made it about 2/3 of the way on the stone and the rest was on the floor of the oven and hanging out the door. There was no way I could move the pizza at that point, so I just folding over the part that was hanging out and left it to cook.

After about 5 minutes the toppings were bubly and more importantly, the crust had achieved the much vaunted state of crispy blackness**- you know, the one where the crust is crispy and golden-brown except for a few spots that have gotten black and crisp? Not burnt-- just so crisp I never thought I could achieve them in my home oven.

Well-- to sum up this long story-- this dough is amazing and you must make it at home. Also-- do yourself a favor, get a pizza stone.* My cost about $15 at Target and now I'm planning to bake all sorts of yeast breads on it.

*Well, after my incident, you may want to invest in a pizza peel too.

** I was so impressed by the crispy blackness I though it should be the picture for this post. Oh- my kitchen table is not usually so messy but I made the pizza a few days before we moved...


Pizza Dough
Original recipe taken from “The Bread Baker’s Apprentice” by Peter Reinhart.

Makes 6 pizza crusts (about 9-12 inches/23-30 cm in diameter)


Ingredients:
4 1/2 C. (607.5 g) bread flour or all purpose flour
1 3/4 t. Salt
1 t. Instant yeast
1/4 Cup (60g) Olive oil
1 3/4 Cups (420ml) ice water
1 Tb sugar
Semolina/durum flour or cornmeal for dusting (I just used AP flour)

DAY ONE

Method:
1. Mix together the flour, salt and instant yeast in a big bowl.

2. Add the oil, sugar and cold water and mix well in order to form a sticky ball of dough. On a clean surface, knead for about 5-7 minutes, until the dough is smooth and the ingredients are homogeneously distributed. If it is too wet, add a little flour (not too much, though) and if it is too dry add 1 or 2 teaspoons extra water.

The finished dough should be springy, elastic, and sticky, not just tacky.

3. Cut the dough into 6 equal pieces (or larger if you want to make larger pizzas).

4. Make sure your hands are dry and then flour them. Gently round each piece into a ball.

5. You need to refrigerate the dough overnight. Your options are to place the dough on a oiled baking sheet and cover with plastic wrap or to put each dough ball into an oiled bowl and cover with plastic wrap. The point is that the dough must be separated into individual balls and shouldn't touch each other.

6. Put the dough into the refrigerator and let the dough rest overnight or for up to thee days.

NOTE: You can store the dough balls in a zippered freezer bag if you want to save some of the dough for any future baking. In that case, pour some oil(a few tablespooons only) in a medium bowl and dip each dough ball into the oil, so that it is completely covered in oil. Then put each ball into a separate bag. Store the bags in the freezer for no longer than 3 months. The day before you plan to make pizza, remember to transfer the dough balls from the freezer to the refrigerator.

DAY TWO

7. 2 hours before you make it the pizza, remove the desired number of dough balls from the refrigerator. Dust the counter with flour and spray lightly with oil. Place the dough balls on a floured surface and sprinkle them with flour. Dust your hands with flour and delicately press the dough into disks about 1/2 inch/1.3 cm thick and 5 inches/12.7 cm in diameter. Sprinkle with flour and mist with oil. Loosely cover the dough rounds with plastic wrap and then allow to rest for 2 hours.

8. At least 45 minutes before making the pizza, place a baking stone on the lower third of the oven. Preheat the oven as hot as possible (500° F/260° C).

NOTE: If you do not have a baking stone, then use the back of a jelly pan. Do not preheat the pan.

9. Generously sprinkle the back of a jelly pan with semolina/durum flour or cornmeal. Flour your hands (palms, backs and knuckles). Take 1 piece of dough by lifting it with a pastry scraper. Lay the dough across your fists in a very delicate way and carefully stretch it by bouncing it in a circular motion on your hands, and by giving it a little stretch with each bounce. Once the dough has expanded outward, move to a full toss.


NOTE: Make only one pizza at a time.
During the tossing process, if the dough tends to stick to your hands, lay it down on the floured counter and reflour your hands, then continue the tossing and shaping.
In case you would be having trouble tossing the dough or if the dough never wants to expand and always springs back, let it rest for approximately 5-20 minutes in order for the gluten to relax fully,then try again.
You can also resort to using a rolling pin, although it isn’t as effective as the toss method.

10. When the dough has the shape you want (about 9-12 inches/23-30 cm in diameter - for a 6 ounces/180g piece of dough), place it on the back of the jelly pan, making sure there is enough semolina/durum flour or cornmeal to allow it to slide and not stick to the pan.

11. Lightly top it with sweet or savory toppings of your choice.


NOTE: Your crust is very thin-- it can't support a 'pizza hut' set of toppings. Less really is more here.

12. Slide the garnished pizza onto the stone in the oven or bake directly on the jelly pan. Close the door and bake for abour 5-8 minutes or until toppings are bubbling and the bottom is brown and crisp.

13. Remove from oven and eat!

29 September 2008

Better late...

Yes, I am a few days late with this month's Daring Bakers challenge but I am so glad I did it. This was the first savory challenge I've done and also the first that didn't require me to buy any special ingredients, or take half a day. Not that I'm complaining- I like to spend time in the kitchen, but with the way this month has been going I had given up hope of completing the challenge until I actually took the time to read the recipe.

This month we made lavosh crackers. As the challenge was hosted by two of our alternative bakers, Natalie from Gluten A Go Go and Shel of Musings From the Fishbowl the idea was for all of us to try our hand at gluten-free baking and a vegan dip but our hosts kindly gave us instructions for wheat based crackers as well. I chose to do the wheat option since I had everything for it already in the house and I didn't get around to the dip quite yet...

I was shocked at how quickly and easily the crackers came together. Basically mix, stir, knead. Then let it rise for an hour and a half and roll out as thinly as you possibly can top and bake. That's it. I decided to top my crackers with sesame seeds (on one half) and molasses sugar (on the other) to have both savory and sweet crackers. The sesame seeds didn't adhere to the crackers as nicely as I would have liked them too but that was my only and admittedly very minor issue with the whole recipe.

The crackers are crisp, delicious and totally satisfying, not to mention way cheaper than store-bought. I'm going to try to make a batch every week for Zach and I to take with our lunches so I'll keep you posted if I come up with any really good flavors.

One note: I did use a mix of white and whole wheat flour instead of the straight white called for in the recipe. I thought it came the crackers extra flavor, and fiber, yet didn't overpower the delicate nature of the crisps. Feel free to use all white flour if you want

Lavosh Crackers
Adapted from The Bread Baker's Apprentice: Mastering The Art of Extraordinary Bread
Makes 1 sheet pan of crackers

1 C. (4 oz.) white flour
1/2 C. (2.75 oz.) whole wheat flour
1/2 t. salt
1/2 t. yeast
1 T. sugar
1 T. vegetable oil
1/2 C. warm water
1 T. sesame seeds for topping
2 T. dark brown sugar for topping

- Stir the first 5 ingredients together in a medium bowl. Add the oil and about half of the water. Stir together. Keep stirring and adding water until the dough forms a ball.

- Turn the dough out on a lightly floured work surface and knead for about 10-15 minutes. Add more flour if the dough starts sticking to your hands. The dough should be shiny and sort of springy when you're done kneading. To test if it's ready you can pinch off a piece, flatten it into a disk and gently pull on the edges. It should stretch into a very thin membrane. If it rips immediately, keep kneading.

- Put the dough in a lightly greased bowl and cover the bowl with plastic wrap. Allow to rise for about 90 minutes or until doubled in bulk. (About 30 minutes before your dough is ready heat your oven to 350F)

- Divide dough in half (with a sharp knife). Lightly grease your work surface and set the dough down. Pat in to a rough square shape and lightly flour the top. Roll out as thinly as you possible can (we're talking paper-thin). You might need to give the dough a few breaks while rolling to allow the gluten to relax. Transfer to a cookie sheet. Repeat with the other dough.

- Brush the top of the dough with a little bit of water and sprinkle on your topping.

- Bake for 15-25 minutes or until golden brown. Baking time really depends on how thick your dough is. Remove from oven and let cool for 10 minutes in the pan then break apart and serve or store in an airtight container.

10 September 2008

Beetroot and Goat Cheese Souffle


I have been thinking about souffle a lot lately. I couldn't really tell you why, as I have only had it once or twice in my life, but the idea got stuck in my head. The lack of a souffle dish held me back for a few weeks, as I though, and I'm sure some purist out there would agree, that a souffle can only be made in a special vessel of an exact height and circumference and with a very small lip on the top to help the souffle rise. For weeks I dispared of buying a yet another piece of kitchen equipment and one that had such a specific purpose that I probably couldn't use it for anything else. Then I finally said 'to heck with it' and decided that I would make mini souffles in my ramekins instead.

At first I thought I might be dooming myself to failure because of all those old kitchen myths I had heard about souffles (like the kind that say you can't even walk through the kitchen while its baking or it will fall) but I had become so fixated on the idea I will willing to risk utter defeat. When I started looking up recipes, I was shocked to come across some that were specifically for individual size souffles baked in 6oz ramekins- just what I have.

I selected two recipes that seemed the most promising, one from Alton Brown because I trust his proportions and directions and another from the food network website that was specifically for mini souffles, and decided to combine the two. I must have been feeling more than usually adventurous that night because in addition to combining two recipes, I decided that instead of making a plain cheese souffle, I would make a roasted beet and goat cheese souffle.

After getting out all the ingredients I got to work. First I peeled and chopped three little beets and roasted them for a few minutes. Then I separated the eggs, added the whites to the bowl of my mixer and putting the yellows into a medium bowl. Next I set out to making the flavor base of the souffle by making a roux, then adding hot milk (that had a bay leaf steeping with it), garlic powder and the goat cheese. I wisked this mixture into the egg yolks and then added the beets, which promptly turned the whole thing a lovely shade of pink. After the eggs whites were beaten to a stiff peak, I carefully folded them into the beet cheese mixture and then realized I hadn't prepped the ramekins. As I folded, I shouted for Zach and then barked a set of instructions something like 'butter' 'grate cheese' 'like you would flour' that made no sense at all. I calmed down enough coherently as him to butter the ramekins and then sprinkle Parmesan cheese around the sides.

I poured the souffle mix into the 4 ramekins but still had about half the mixture left over. At this point I was frantic, afraid that all the souffles would fall since I couldn't seem to get my act together on anything. I put the ramekins in the oven and searched for another pan. I didn't have anything else remotely resembling a souffle dish, so I used a loaf pan. After everything was in the oven, I could finally calm down.

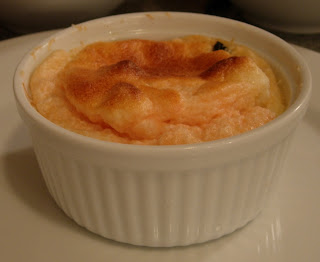
Half and hour later, the souffles were so puffy and golden. The picture you see really doesn't do them justice as the rose to about 3 inches about the edge of the ramekin but began falling as soon as I took them out of the oven. I hurriedly snapped a few pictures and we sat down to eat. I had never had a savory souffle before and I was not disappointed with my first attempt. It had both a rich and airy taste, a bit like a mousse and the beets had turned the bottom a vibrant maroon color. My only complaint was that I couldn't really taste the goat cheese- the Parmesan crust, while deliciously crispy, really overpowered the goat cheese. The beets did stand up well and added a hint of sweetness but I also would have made the pieces a little bit bigger.

I'll give you the recipe here as I made it, but I hope you will figure out a way to either up the goat cheese flavor, or take out the Parmesan. If you do know how-- please let me know. Now that I know souffles aren't impossible and really hard to make, I'm definitely going to try again.

Beetroot and Goat Cheese Souffle
Makes 8, 4oz. ramekins

2-3 small beets (about 3oz or 100g)
1.5 C milk (I used 1%)
1 bay leaf
3 T. butter
3 T. flour
1/2 t. kosher salt
1/2 t. garlic powder
4 oz. (120g) soft goat cheese
2 egg yolks, room temperature
4 egg whites, room temperature
butter for greasing the ramekins
a few tablespoons of grated Parmesan cheese for the ramekins

- Preheat oven to 375F.

- Butter the ramekins and sprinkle the insides with Parmesan cheese, just enough to coat. Place the ramekins on a cookie sheet.

- Peel the beats and chop them into small cubes (about 1/4 in. [.5cm] cubes) and set aside.

- Add the bay leaf to the milk. Heat the milk (I did it in the measuring cup to save a dish) in the microwave or on the stove until hot but not boiling.

- Melt the butter in a small saucepan over medium-low heat and allow the water to cook out. The butter is ready when it stops making a sputtering noise.

- In a small bowl, stir together flour, salt and garlic powder. In a larger bowl, beat the two yolks for a minute or so (by hand). Add the flour mixture to the butter and stir constantly for 2 minutes to cook the flour. You have now made a roux. Fish the bay leaf out of the milk and add the milk to the roux, stirring constantly. Increase the heat to medium-high and continue to stir until the mixture comes to a full boil. Once it boils, remove it from the heat and stir in the goat cheese until melted. Then, slowly add the cheese base to the eggs yolks, wisking constantly so you don't scramble the eggs. This is not as scary as it sounds-- just go slowly. One trick is to have someone else do the pouring so you can concentrate on the wisking. Once all the milk mix in incorporated, stir in the beets.

- Put the eggs whites in the bowl of your stand mixer (if you are lucky enough to have one) or a metal or glass bowl if you don't. Beat on high until the reach stiff peaks. Mix in 1/4 of the mixture to the cheese base to lighten it, then carefully fold in the remaining egg whites. Some streakiness in the batter is ok- you don't want to overmix and take all the air out.

- Spoon the souffle mixture into the ramekins and bake for 25-30 minutes or until puffy and golden. Serve immediately.*

Since the recipe made much more that I though it would we had a few portions of leftover souffle. It did deflate, but was still really tasty for lunch the next day with a salad.

31 August 2008

Eclairs


I was good this month and actually made my challenge early instead of waiting until the last minute like I usually do. This month the challenge was eclairs, hosted by Meeta of What's for Lunch Honey? and Tony. When I saw what the challenge was I felt sort of ambivalent. I had a vague feeling that I didn't actually like eclairs but could not remember if I'd even ever had one so, like any Daring Baker, I decided to give it the old college try.

A few things did intrigue me about the recipe before I got started. One was that the eclairs are made using a pate a choux, a type of French style dough that involves dumping flour into boiling mixture of milk, water and butter and 2) that the eclairs were to be both filled and topped with chocolate. I love chocolate, but would topping and filling be too much of a good thing?

I started with the pate a choux, which proved remarkably easy to make. Simply boil, dump and stir, and stir and stir and then make Zach take a turn stirring when my arm gets tired and then stir again. Once the eggs had been incorporated into dough, I spooned it into a ziploc bag (still no piping set in my kitchen) and piped out the eclairs, then baked them. I had read that eclairs tend to go soggy, so in an attempt to circumvent sogginess, I immediately made a small hole in the side of each eclair when they were done baking to let out the steam and set them back into the warm oven to cool. This didn't help at all as when the eclairs cooled, the air inside condensed, sucking the eclair with it, forming flat little logs that were rather tricky to cut apart.

With step one done, I proceeded to the filling and topping. The filling was a chocolate pastry cream, and while I had never made a pastry cream before, the recipe was clear and it proceeded with no problems. The cream used cornstarch as a thickener and it did indeed do the job, producing a very firm cream somewhere in the consistency range of a jello pudding.

The chocolate glaze was a bit more complicated. It called for first making a chocolate sauce, which would then be used in the finished glazed. It seemed rather fussy to me, but I had the time so I made it and then had a little taste. Good, but not outstanding and not worth the time to make it again. But then on to the glaze. Made like a traditional ganache by melting chocolate into heavy cream, it called for the chocolate sauce and additional butter to be stirred in. Again good, but I just don't think the additional steps of adding the butter and chocolate sauce did anything for the finished product. Well, I take that back. It did seem to make the glaze a bit softer and shinier than a traditional ganache but not by very much.

I assembled the eclairs right before serving, as directed in the recipe and we all had a taste. They were chocolaty. Very chocolaty. Almost too chocolaty. And this is from someone who loves chocolate. One eclair was more than enough, but that was actually a good thing. One small portion of dessert that is very rich and satisfying is much healthier than eating a bigger quantity of lower quality sweets. I did have some extras that I refrigerated overnight and everyone agreed that we liked the taste better chilled, rather than at room temperature.

Bottom line- I did not love these eclairs. I think that I might have liked them better if the eclair shells were slightly crispy (how they are supposed to be) than the soft flat pancakes mine because and if I had used a different flavor pastry cream for the filling. I am really happy that I got to try making pate a choux for the first time and might be trying desserts with it in the future.

If you would like the recipe you can visit Meeta or Tony at the links above.

29 August 2008

Drop Biscuits


As I said previously, two recipes on Flexitarian Menu inspired me last week and I made both of them twice, for the same meal. To go with the summer gratin, I made lemony biscuits with sage and rosemary, except I didn’t use lemon, sage or rosemary. Add in the course of making this recipe twice, I changed so many things that I think it is rather fair to call it my recipe now. So, if you would like to read about the tale of two biscuits, click the link to the right.

I love biscuits. Who doesn’t love biscuits? Flaky, tender, piping hot out of the oven, with a bit of melted butter and a hint of honey, they may be the best quick bread ever. The recipe that I’m writing about though, it not really a biscuit, even though it pretends to be one. A true biscuit involves cutting cold fat (butter or lard) into the flour mixture, then adding the wet ingredients and lightly kneading before cutting out circles for baking. This recipe is really actually for a muffin, for reasons we will get to in a minute.

The first time I made this biscuits I followed the recipe more or less. I used 50% whole wheat flour to add some fiber and I had forgotten to buy a lemon so went without. I knew I needed to add in an acid of some kind to help activate the baking soda, so I used 1 T. of vinegar instead, which had the added bonus of helping to quickly sour the milk (a poor substitute for buttermilk, I know, but it works). I also used parsley and oregano in place of the rosemary and sage since that's what I had on hand. The last substitution I made was to use a bit of yogurt in place of the low-fat mayonnaise the recipe called for. Mayonnaise in a baked good just seemed a bit odd to me. I mixed the dry ingredients in one bowl, the wet in the other, and then combined the two exactly according to the Muffin Method of Mixing taught to me by my eighth grade home ec teacher. The biscuits baked up quickly and we had them straight out of the oven with dinner.

They were rather too wheaty and not herby enough but I thought they had potential and decided to try again. The second go around I reduced the whole wheat to white flour ratio, added about a quarter cup of chopped fresh basil and a quarter cup of Parmesan cheese for added flavor. I skipped the yogurt and used one tablespoon vegetable oil for added tenderness. I baked half of the biscuits just after I had made them, and put the other half in the fridge to bake up the next day. This round was much more successful than the first- a pleasant but not overwhelming wheat flavor and a hint of basil and Parmesan to make it interesting but the best results came the next morning. After sitting overnight in the fridge the basil permeated the batter and the biscuits had deeper flavor. They were truly delicious. So, if you had a little time, make this batter ahead of time and let it sit for a few hours before baking.

Though they're not really biscuits, this drop biscuits are my new go to recipe for a dinner carb- quick, relatively healthy and way more interesting than spaghetti and way healthier than real biscuits.

Drop Biscuits
Inspired by Flexitarian Menu
Yields 12, 2-3 in. biscuits


Dry Ingredients
1 and 1/3 c. white flour
2/3 c. whole wheat flour
1 T. baking powder
fat pinch salt
1/4 c. fresh basil, finely chopped
1/4 c. grated Parmesan cheese

Wet Ingredients
1 c. lowfat milk
1 T. apple cider vinegar
1 T. vegetable oil

- Preheat oven to 400F (if you are baking immediately). Grease a cookie sheet. Measure out the milk and add the vinegar to it.

- Mix all of the dry ingredients in a medium bowl till evenly combined. Make a well in the center and add the milk mixture and oil. Stir until just combined. Proceed immediately or let the dough rest for up to overnight.

- Drop the batter into 12 even portions on the cookie sheet. Bake for 15-20 minutes until golden brown. Serve immediately.

08 August 2008

Chocolate and Zucchini Muffin Cakes

At last those muffins that I've been talking about since forever. Before we left for Hawai'i, I had a zucchini in the fridge that I needed to use so I thought 'what better place to find a recipe' than on Chocolate and Zucchini my favorite food blog. I found Clotilde's recipe for Chocolate and Zucchini cake and decided to make it. I made a few alterations to her recipe, as I wanted to make cupcakes since they would be easier to give away (and carry on the plane as a snack). I also upped the amount of whole wheat flour used, and added just a bit of extra zucchini as it seemed silly not to just grate the whole zucchini I had. I skipped the coffee granules (I can't imagine the look on Zach's face if I tried to bring home a jar of Nescafe crystals) and the hazelnut topping since Zach hates nuts (wow- this really makes it sound like I am totally pandering to Zach's tastes but I can assure you, I am not and that I do use ingredients that he doesn't really like on a regular basis).

Everything came together very quickly into a super thick batter. In fact, it looked like shredded zucchini with a thin coating of chocolate goo, but after spooning it into the muffin liners that I had sprayed with Bakers Joy and baking, the zucchini almost melted into the muffin cakes. Why I am calling them muffin cakes? Clotide calls it a cake on her post and the batter comes together like a cake by creaming the butter and the sugar, but the result is more in line with what Americans generally consider a muffin, even though it's not made with the muffin method. I thought of them as cupcakes, but everyone who tasted one commented that the 'muffins' were really good, hence my decision to call them muffin cakes.

Either way, they are delicious. The cocoa in the batter combined with the chocolate chips give the muffin cakes a really deep, rich chocolate flavor. (I did consider briefly not putting in the chips to make it a bit healthier but I'm glad I used them). The zucchini almost melts into the cake, giving it a subtle flavor and keeping them extremely moist. By using half whole wheat flour the muffin cakes are quite substantial and filling, even though they appear deceptively small as they don't rise much. They were really the perfect airplane snack food too. While everyone else was buying airline snack boxes or pulling out half-way smushed sandwiches, Zach and I pulled out fragrant muffins, carefully packed to avoid being pancaked. I think we may have gotten a jealous looks from other passengers.

Chocolate and Zucchini Muffin Cakes
Adapted from Chocolate and Zucchini
Makes 24


1 c. (120 g) AP flour
1 c. (112 g) whole wheat flour
1/2 c. (40 g) unsweetened cocoa powder
1 t. baking soda
1/2 t. baking powder
1/2 t. salt
1/2 c. (1 stick) butter, softened
1 c. brown sugar
1 t. vanilla extract
3 eggs, at room temp.
2 heaping cups shredded zucchini (300g)
1 c. chocolate chips

- Preheat the oven to 350. Prep muffin tins with paper liners and grease well using Baker's Joy spray or equivalent.

- In a large bowl mix: flours, cocoa, baking soda and powder and salt.

- Using and electric mixer, beat butter and sugar until fluffy and light in color. Add vanilla extract and one egg at a time, beating thoroughly after each addition.

- Add all but 1/2 c. of the flour mixture and stir well.

- Add the zucchini and chocolate chips to remaining flour mixture. Toss to coat. Fold the zucchini and chips into the batter- it will be really thick so don't worry to much about mixing firmly.

- Spoon into prepared muffin tins and bake for 20-25 minutes or until a toothpick inserted in the center comes out clean.

- Pop the muffin cakes out (careful- they're hot) and cool on a wire rack. Eat immediately or exercise your will power by wrapping them tightly in foil- they keep well for a few days on the counter.

06 August 2008

Overnight Cinnamon Rolls


Zach and I were up in New Jersey visiting my parents this past weekend and as an added bonus, D- my best friend from high school and her boyfriend came to visit as well. After a weekend spent shopping, visiting the State Fair and hiking it was time to head back to the grind. I wanted our last breakfast to be a bit of a treat (not that the entire weekend wasn't) so I decided to make cinnamon rolls from a recipe I saw Alton Brown make on the Food Network. I did cheat a little bit by using the bread maker to mix and knead the dough, but I think that was ok considering it gave me more time to focus on the game of Squatter, the Australian sheep farming game, which we were playing.

I was so focused on my severe financial distress after having to pay income tax two turns in a row, that I failed to completely read Alton's instructions and ended up dumping all 20 ounces of flour into the bread machine, instead of reserving 3/4 C. to be added only if the dough was too wet, as the recipe called for. Luckily my dad is rather handy with the bread maker and kept adding spoonfulls of buttermilk and water until the dough reached the right consistency while I went back to sheep trading. By the time the dough had risen and it was time to roll out and shape the rolls, I had lost nearly all of my sheep and money and decided to abandon the game for baking as it was clear that I had absolutely no "aptitude for a rural career" as it states in the game instructions.

Then I realized that there was no ground cinnamon in the cupboard (I hadn't even though to check- it seems like one of those things that everyone always has on hand, doesn't it?) so my dad came to the rescue again by taking out his old coffee grinder and grinding up a few cinnamon sticks for me (why he had sticks and not powder on hand, I don't really know) and the recipe was saved. I rolled out the dough to the 12x18in rectangle called for in the recipe (I even used a measuring tape on it), spread the melted butter over it, than patted on the sugar and cinnamon mixture. Rolling the dough up wasn't as bad as I expected and I cut it into 12 mostly even pieces. The dough rose overnight in the fridge and then the next morning I 'woke' the dough up by placing it in an oven with a small pot of boiling water for about 20 minutes, then baked it at 350 until the rolls were a deep golden and we were all salivating from the cinnamony smell wafting through the air.

The rolls came out looking so good I took a picture right away and liked this photos of the naked rolls even better than the ones I took after their topping of cream cheese frosting. The rolls came out much better than I had expected (given the extra flour I had put in) and I might even say better than those at a certain chain whose smell always seems better than their taste. The roll itself was slightly less tender than the chain ones, but the overall taste had just the right balance of sweet to cinnamon to warm bread and judging by the immediate silence which fell over the table when we started eating, everyone else liked them two.

Since I made Alton Brown's recipe exactly (with the help of the bread machine) I won't post the recipe here but you can get it from the
Food Network website.